Thursday, April 25, 2013

Student Work: Portrait Assignment

This week's assignment was to shoot a portrait using natural light.
These portraits by Butsurin Jinnai show 2 completely different moods captured by light in one setting, just by changing the subject's position in relation to the sun.

Photo by Sheetal Patel

This photo by Sheetal Patel beautifully captures soft window light
This portrait by Joel Stuckey is backlit, creating a lovely hair highlight from behind.

Wednesday, April 24, 2013

Portraiture with Window Light: In-Class Exercise

Students from our class offered to be the subject in last week's shooting demo that I did. We look at the differences in quality of light a simple window can offer. Window light looks different when coming from the side, behind or directly at your subject's face. Use of a fill card (reflector or white poster board) can alter the light dramatically and fill in shadows to reveal more detail.


*Note that the window we used did not have direct sun coming through it- the light was diffused so the shadows were softer.

Student Work: Night Landscapes

Below is a selection of images shot by students for the Night Landscape assignment:
Long exposure shows motion. Photo by Joel Stuckey
These 2 photos by Gary Prideaux perfectly illustrate the difference between a long exposure night shot and a high ISO night shot. A high ISO often produces graininess, but doesn't require a tripod:
Short Exposure, High ISO- grainy! Photo by Gary Prideaux

Long Exposure, low ISO, more clarity. Photo by Gary Prideaux
This long exposure shot by Mira Zaslove shows some motion on the water,
but the architecture is crisp since she used a tripod.

Thursday, April 18, 2013

Portraiture + Photoshop

Today's Class Overview:

Portraiture using window light- Demo/ Exercise
Review of Camera Raw processing, exporting as Hi-Res Jpgs.
Intro to Photoshop (tools and basic adjustments)
Basic Portrait Retouching

PORTRAITURE

Portraiture can mean many things. Environmental portraits of people show someone's surroundings and close up portraits can be more about a personal's expression or emotion. Stories are told in different ways.
environmental portrait by Joel Sternfeld
close-up portrait of Picasso by Richard Avedon (notice the side lighting)


Lens Choice:
Lens Length Impacts Portraiture!
In taking pictures of people choosing a longer lens (like above 50mm) is generally more flattering. Try standing farther away from your subject and zooming in if you have a zoom lens.
Image on left is a wide angle (like a 18mm lens). Image on right is a longer lens (like 85mm) Image credit here.

 In Class Demo Exercise: Taking a Portrait with Window Lighting

1.) SIDE LIT: Take a photo with side lighting from a window. Take one with and without a fill card.   Try having the subject's face pointing toward  and then away from the light.

Examples of (what could be) window side-lit portraits:
by Annie Lebovitz
by Annie Lebovitz
 When shooting portraits, pay close attention to the direction the light is coming from and the quality of the shadows.

2.) BACK LIT:
Try taking a picture with your subject's back to the window. Camera faces window. How does this affect your exposure settings and the light on the face?

3.) FRONT LIT:
Try taking a picture of someone where they are facing the camera and the light is hitting their face directly (window behind the photographer, subject looking out window)

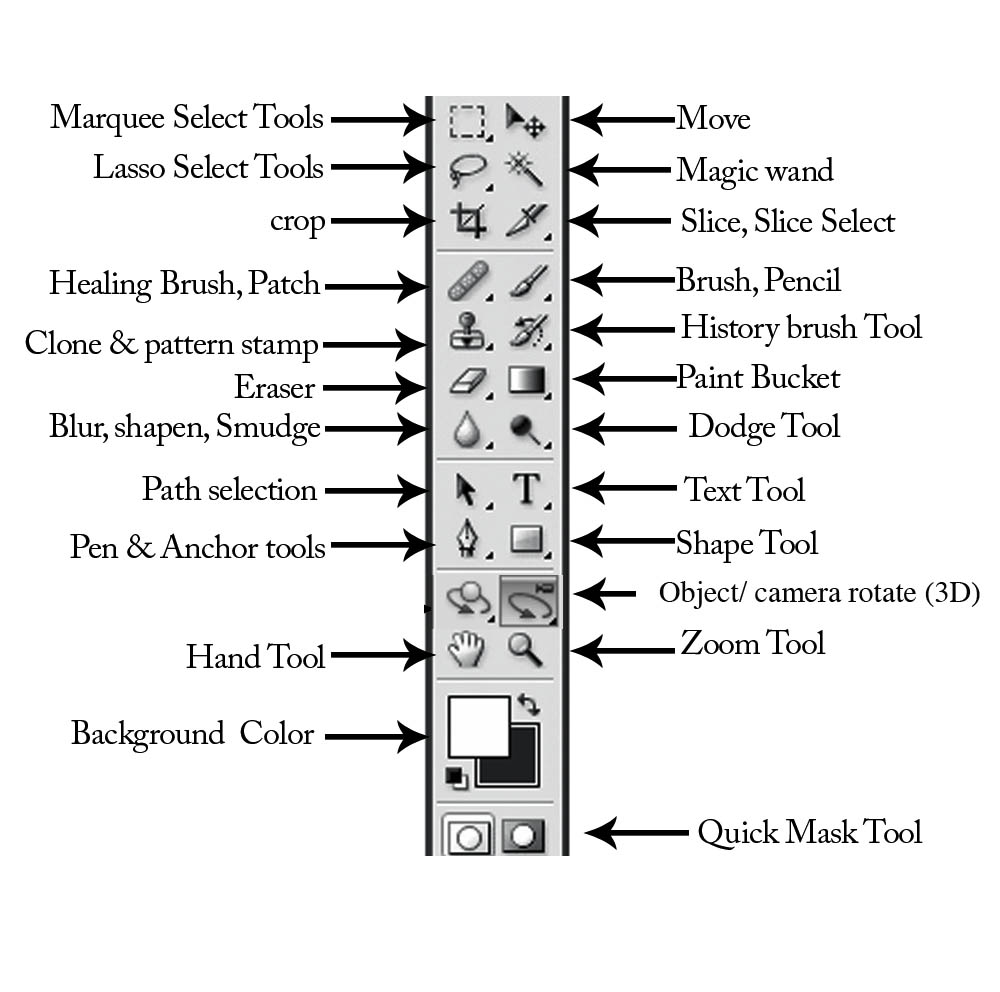
PHOTOSHOP TOOLS OVERVIEW:
 (see the tools overview in previous post)

Retouching a portrait:
Process the RAW file and open it in Photoshop.
-Layer 1 (bottom of stack) = Background
-Layer 2 = Background Duplicate (Duplicate the background, call it "retouching" or "patch and clone stamp". Fix skin here) You may also like the Healing Brush Tool for skin.
-Layer 3 (top of stack) = Curves "brighten layer" for brightening under eyes, whites of eyes, teeth, etc:


Retouching: -->
1. Before doing anything, make a duplicate copy of the background layer and call it Retouching (control click layer, choose ‘duplicate layer”). Zoom WAY in! Work at least at 100%, but maybe even at  200% or more. Using a combination of the following tools, Clone Tool, Healing Brush Tool, Spot Healing Brush Tool, Patch Tool and filling with content aware to rid of all blemishes and stray hairs. Turn brush hardness all the way off, to 0% so that your brushes are soft. Experiment with the opacity of each tool as well.  (Clone & Healing brush tools also work on empty layers if you choose “sample all layers” from the bar at the top.)

2. To add slimming: Duplicate the “retouching” layer and call it “Liquify” -Liquify minimizes double chins, chubby cheeks, odd facial angles, crooked bangs,  bunched up clothing, etc. Set Brush Size and Brush density to “17”- this is a good starting point.

3. Brighten Teeth, Under Eyes or Whites of Eyes with a curves mask. Make a curves adjustment layer and brighten the whole image by moving the curve toward the upper left corner. Invert the layer mask so it’s black (command i). Use a very soft white brush (hardness = zero) and paint over the area you’d like to be brighter. Adjust opacity of layer if needed. (Similarly, you can take the yellow out of teeth with a “selective color” mask.)

WHEN DONE....Save as TIFF to maintain layers. Save another copy as a JPG to be able to email it, make a print, upload it, etc. The TIFF is your Master File and if you want to make any edits layer, you'll go back to the TIFF.


Thursday, April 11, 2013

Week 2: Camera Raw

First, please go to this link to download the Week 2 files so we can work together.

Homework Due Today was to shoot images in different lighting situations. Open the folder of images I shot of citrus for this assignment and let's look at them together.

WORKFLOW
Intro to Bridge:
When starting with a large group of images I've just shot, I begin by previewing them all in Bridge, Filmstrip view. I delete ones I don't want to keep, rename all the files, apply my copyright metadata, star my favorites, sort them, then open up into Camera Raw. 
To open and process lots of images at once, highlight them, then hit Return/Enter and they should open up automatically into Adobe Camera Raw. Looks like this (see all the images stacked up on the left):


When opening up a RAW file into Photoshop, it will initially open into the Adobe Camera Raw (ACR) window. It looks like this:

Be sure to click the blue text at the bottom to set your resolution to 300. Leave everything on "DEFAULT" so you can control the quality of all aspects of the image. When you move each slider, the adjustments are saved into a "Sidecar" .xmp file that is stored in the same folder as your RAW file. If you toss this .xmp file, your image will go back to how it was when you had just downloaded it off your camera.

The main adjustments you want to make for most images are Temperature, Exposure, Highlights and Shadows. In the image below, I made it a bit warmer by moving the temperature slider to the right, and I brought out detail in the shadows by moving the shadows slider to the right. Notice it's a bit grainy because it was dark and I was at ISO 800.

After processing a large group of images, you usually hit "DONE" or "SAVE IMAGES". I generally save as JPGs, which creates a new folder.  I then photoshop/retouch the hi-res JPGs.

For a single image, when you hit "OPEN IMAGE" in the lower right hand corner, it opens up into "Regular" Photoshop, and looks like this, with a layers palatte:

Description of Tools:


Carpooling to/from Class

A couple people have reached out asking about carpooling to/from class. If anyone is interested in a ride share back to SF after class, please reach out to Tom: tdhaggerty@gmail.com

If there are others in the class looking for carpooling options to/from other parts of the Bay Area, let me know and I can try to help coordinate. erin@eringleeson.com

Thursday, April 4, 2013

Week 1: Intro to Digital Photography


What Makes a Good picture? Lighting, exposure, composition, quality, color, and subject matter are some of the main considerations.

Let's start with composition. We will look at the work of 3 well known photographers to think about composition: Henri Cartier-Bresson, William Eggleston and Gregory Crewdson.
Here's a short video interview on the working process of Gregory Crewdson:


Considerations when thinking about composition:
  • Look at all 4 corners of your frame- are you chopping anything off awkwardly?
  • What is the subject? (Should be clear what the viewer should look at)
  • Rule of 3rds, strive for balance
  • Try NOT centering your subject
  • Are there any interesting lines in the image I can work with?
  • Look for lines, shapes, geometry that guide the eye and frame the subject
  • create some "tension space" between objects in the frame.
Rule of Thirds: breaking the frame in thirds both horizontally and vertically, place points of interest in the intersections or along the lines so that your photo becomes more balanced.

Look how the composition in the above image by Henri Cartier-Bresson falls perfectly into the rule of 3rds.

Always Shoot RAW: (not JPG)
RAW files are much bigger because they store much more information in the shadows and highlights that can be subtracted later if need be.


Digital Camera Basics:
Try taking your camera off Auto and shooting on Manual. "M Setting". You'll really be able to custom tailor the look you're going for that way.

There are 3 main factors that determine exposure, or how bright or dark your picture will be: F-stop (same as aperture), Shutter Speed and ISO:


Start here:

Try setting your camera to ISO 200, 1/60 Shutter speed and F3.5.  Think of it as a science experiment - keeping one item constant, change the other 2 variables. I usually keep my F-stop as the constant (at the lowest number my lens allows like F2.8 or F3.5) and change the shutter speed and ISO according to the lighting around me. I change the shutterspeed first, and changing the ISO is my last resort (and usually only happens when I'm in a darker area).

  • Aperture/F-Stop: (Aperture and f-stop are the same thing). I generally set my F-stop to the smallest number possible (like F2.8 or F3.5) because I like a blurry background (shallow depth of field). The smaller the F-stop number, the blurrier the background:


  • Shutter Speed: Set your shutter speed to 1/60 or faster (1/125, 1/250 etc...) to avoid motion blur when shooting hand-held. Shooting at a shutter speed slower than 1/60 (1/30, 1/15, 1/4 etc... ) may cause motion blur. You should use a tripod when shooting at a number smaller than "60".


  • ISO: Take ISO off "Auto" and set it manually. The only reason to increase the ISO number is if you're in a low light setting (indoors or at night). Depending on your camera, when you choose a really high number, like 1600 or higher, you may start to see unattractive graininess (speckelled noise). Like this:


 Other items to set on your camera:
  • Auto White Balance. This will ensure your image never looks too blue or too orange. Below is what may happen if you have your white balance on the wrong setting for where you are shooting. (the flower images below were shot inside)
How do different lenses make the picture look different?
Here's a great overview. But basically, if you have one zoom lens, try shooting your subject both from up close and from far away. The perspective will change:

Generally, portraits are more flattering when you stand far away and zoom in as well.

RAW vs. JPG:

RAW files are the ones that come right off your camera. You can't save a file as RAW. Each manufacturer has its own label...Nikon RAW files are .NEF,  Canon's are .CRW, etc...

JPGs are smaller compressed files. They take up less room on your computer because they don't have as much detail and information. JPGs can be both hi-res or lo-res. You can print from the hi-res ones, and the lo-res ones go online.

When files have layers in Photoshop, you save them as .PSD or .TIF. (JPGs and RAW files cannot have layers).  It really varies file to file and camera to camera, but below is a very estimated summary of approximately how big these types of files are.

Also very important to remember is that once you shrink an image, you can't make it big again. It's kind of like cutting a piece of paper in half: you can tape it back together but it won't look as good. When making a web size image, always save a duplicate.

Image on the left is print size (hi-res). Image on the right was shrunk to web size (lo-res) then enlarged back to print size (and looks terrible!)